![Easter Paper Crafts for Kids [Video Tutorials]](https://edphin.com/wp-content/uploads/2025/12/easter-paper-craft-tutorials-950x500.jpg)
We are here with paper craft tutorials to celebrate the festival of the Easter. Kids love to create paper masks in bunny or chick shape, or the egg on the occasion of the Easter. They can also take help of these video tutorials to create Easter Craft Projects for the school or competitions.
3 Easter Craft Ideas for Paper masks
Easy crafts for Easter. These paper masks require very little time and are perfect for Easter. You will enjoy making it as well as your kid will also enjoy it and will love to play with it. These paper masks will make your Easter more interesting. You will require very few materials for making it which is a good thing and an easy way to proceed with your work because you will not require many things.
So try these and make your Easter more enjoyable.
Materials Required:
- A4 sheets
- scissor
- glue
- pen
- stick
1. Craft: Hen
Procedure:
- Take a sheet and put a circular structure above it and draw a curve and cut it with the help of the scissor.
- Take the sheet and cut the curves at the bottom as shown in the video.
- Now draw 2 circles on that paper and cut them out and make the holes.
- Take another sheet and cut out a triangular shape and curve shape as shown in the video.
- Now paste both of them on the paper.
- Take a stick and paste it on the backside of the paper with the help of a paper on it.
That’s it! your hen mask is ready.
2. Craft: Chicken
Procedure:
- Take a sheet and draw a circle and cut it out with the help of the scissor.
- Now take a piece of paper and cut out 2 wings as shown in the video.
- Take the circle and cut fringes all over the circle.
- Now draw 2 small circles on the circle and cut them out with the help of the scissor.
- Take another paper and cut out a strip and fold it in half and cut it from the middle.
- Now take both the strips and paste them on the backside of the circle with the help of the glue.
- After pasting the curve the bottoms of both are a little towards the front and cut fringe as shown.
- Take the wings and paste them into the circle.
- Now take a paper and cut out a cone and paste it on the circle as shown.
- Take a stick and paste it on the backside of the circle with the help of paper.
That’s it! your Easter chicken is all set.
3. Craft: Bunny
Procedure:
- Take a sheet and draw a circle and cut it with the help of the scissor.
- Now draw 2 ears as shown in the video and cut them out.
- Cut that circle into a curvy heart as shown.
- Draw 2 circles on it and cut it with the help of the scissor.
- Take a paper and cut out a circle.
- Take another paper and cut out 3 strips.
- Paste that strips on the smaller circle and then paste them all together on the paper.
- Now take a sheet and cut out 2 inner ears and paste them on the big ears.
- Take the ears and paste them on the paper.
- Take a stick and paste it on the backside of the paper with the help of a paper on it.
That’s it! your Easter bunny is ready.
Your Easter crafts are ready. these are very easy to make and take very little time. Even you will enjoy making it and this will obviously be filled with lots of love. Try it and you will definitely be going to love the end result. These are super easy and simple crafts for Easter.

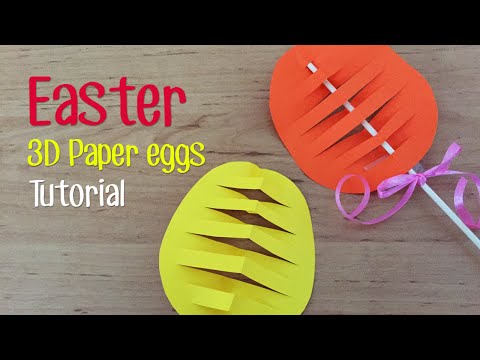
How to Make a 3D Easter Paper Egg
Hi guys! This is a whole season of festivals. So, you might be very happy now. You might forget some time about the upcoming festivals due to your busy weeks. Here we came to give you a happy reminder that Christmas is coming! This means easter is also coming. Christmas and Easter have now become the festival of all communities, and people worldwide celebrate them like huge events. Some of you might hear about easter day but not properly know its facts and origin and how it’s related to Christmas. Easter is a Christian festival and a holy week. Christan celebrates it as the resurrection of Jesus from the dead. This day made Jesus the ‘Son of God’.
So, you can now understand it is the holy communal festival of the Christians. As Christmas is the day we celebrate the birth of Jesus Christ that’s why this day becomes more significant to us. Churches are decorated with flowers. People hunt Easter Bunny and eggs. People believe that this day represents the fulfillment of the forecast of the old law and reveals God’s plan for humankind.
Now that you know some significance of Easter it’s time to reveal today’s craft. You might have predicted it will be related to easter. Then you’re right! Today you are going to make a 3D paper Easter egg. Easter eggs are usually used to decorate the gifts of Easter day. This is a custom on Easter day to give them as chocolate. This craft will be done to decorate your house. So, without any words, let’s get started!
Materials:
- A big rectangular shape page.
- A pencil.
- A stick.
- A bow.
- Scissors.
Procedure:
- Take a big rectangle shape page, fold the bottom of it straightly by making a straight and wide long breadth and small length rectangle.
- Grab a pencil and draw a half egg shape on the folded portion.
- The eggs should be drawn from under to the middle portion of the folded part.
- Make sure that it never reaches the end of the fold.
- Cut off the pencil outline with a scissor.
- Look there should be a fold line in the middle.
- Fold the egg shape like before and cut the folded side of the egg by making parallel lines vertically with scissors.
- Leave space between the cut lines.
- The cuts should be from the folded side to the little before the end of the other side.
- Unfold the paper, take the pencil and put it through the cut lines, and leave one line.
- After you are done with inserting the pencil, fold the middle portion of the lines to give it a more 3D base.
- Put out the pencil.
- Now, you can decorate it with a beautiful stick by inserting it through the lines.
- Add a cute now on the stick.
- Your beautiful easter paper egg will be ready!
- Take the rest of the paper and make many of them.
Look how amazing it looks! As you can see this process is so easy and requires fewer materials that you can easily make many of them. Use your sense of creativity and make them in various styles and colors. You can decorate your house with them on Easter and Christmas day. Your guests are gonna love them. Hurry up! Grab your stationery and let’s make a 3D paper Easter egg.
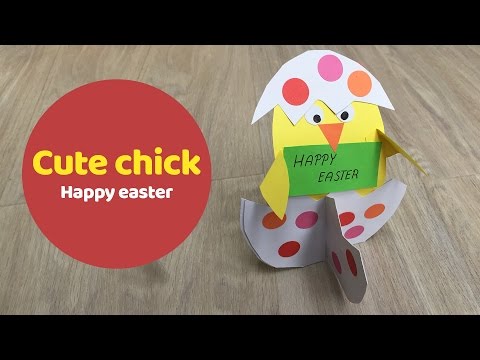
Cute Chick in a Shell – Easy Easter DIY for Kids
An easy and simple craft for Easter. It’s good for kids to try and enjoy this beautiful and cute chick in a shell papercraft. You will require very few materials for making it which is a good thing and an easy way to proceed with your work because you will not require many things. You can make these with your kids as well, they will pretty much enjoy it and will surely love to decorate their house with this Easter craft.
Here are some step-by-step procedures for making this Easter papercraft. It’s very easy to make and takes very little time. Kids will have lots of fun making this easy paper chick in shell craft. Try it and gift it on Easter. Even your kids can make this paper chick craft and gift it to their friends on Easter. You can also see your kids making these and enjoying and playing with them. Try it and decorate your house with this cute Lil papercraft this Easter.
Materials required:
- A4 sheets
- scissor
- glue
- pen
Procedure:
- Take a sheet and draw 3 eggs as shown and cut them out with the help of the scissor.
- Take a pencil and make zig-zag lines on the bottom as well as on the top of the eggs.
- Now take the scissor and cut them out in a zig-zag pattern.
- Take a sheet and draw a U shape and cut it out with the help of the scissor.
- Now paste the U shape sheet between 2 eggshell-looking paper/zig zag paper.
- Take a sheet and draw 2 eyes and cut them out and paste it on the U-shaped paper.
- Take another sheet and draw a triangle shape as shown and cut it and paste it.
- Now take a sheet and draw 2 wings and cut them out.
- Take the wings and paste them on the U-shaped paper.
- Take a small rectangular piece of paper and paste it as shown.
- Now fold the wings towards the rectangular paper.
- Take the 2 top parts of the zig-zag paper and paste them on the top of the U-shaped paper as shown in the video.
- Now take the scissor and cut a straight line on the bottom of the eggshell.
- Take another shell and cut a straight line from the top and put in both the eggshells as shown in the video.
- You can decorate the eggshell as per your likeness.
That’s it! your cute chick in a shell is ready for Easter. Kids will love doing it and will decorate their house for Easter. It will help them in many ways, they will come up with many new things, and watching them doing this is a very delightful experience. So engage your kids in these kinds of crafts for Easter and they will love doing it and it is beautiful as well.
These are some of the wonderful Easter craft tutorials for you and your kids. Don’t wait, take some paper and start making them.